Web App
Prerequisites
To start developing web-based Strolch apps you need the following:
- Apache Tomcat 10.1. Just unpack it somewhere, to be used later, when running the application.
- NodeJS v11.x (other versions don’t work with Bower, the installation is described below.
Note: Strolch’s Web UI is still using Polymer 1.x. This isn’t a big concern, as thanks to the polyfills, it works on all browsers, including Internet Explorer 11.
Install the web dependencies
The Strolch Web App uses NodeJS v11.x to build the web dependencies.
Please
download the relevant platform’s package, unpack it, and add the bin directory
to your path variable and add a NODE_HOME variable pointing to the root directory of the NodeJS folder.
Test that NodeJS is working properly:
$ npm --version
6.14.2
Once NodeJS is installed, then you can prepare the web dependencies:
npm install -g bower
npm install -g gulp
And then check that both bower and gulp work as expected:
$ bower --version
1.8.14

$ gulp --version
[17:22:56] CLI version 2.3.0
Creating a Strolch Web App
The following shows the maven command to create the new maven project using Strolch’s webapp maven archetype. Note that you should replace the placeholders in the brackets:
Note: you need to have the Strolch Maven archetypes installed to your local maven repo, otherwise the following command will fail.
mvn archetype:generate \
  -DarchetypeGroupId=li.strolch \
  -DarchetypeArtifactId=strolch.mvn.archetype.webapp \
  -DarchetypeVersion=0.4.0 \
  -DgroupId=<my.groupid> \
  -DartifactId=<my-artifactId> \
  -Dversion=<my.version> \
  -Dpackage=<my.package> \
  -DappName="<my app name>"
Installing the web dependencies
In the newly generated artifact, change to the webapp folder, and then run npm install:
cd <my-artifactId>/src/main/webapp
npm install
This will first install the NodeJS modules, and then call bower to install the bower packages.
Note: Whenever the bower.json is changed, e.g. updating a version or adding a package, then you
should
again call npm install inside the webapp folder.
Building and running the WAR locally
Once the web dependencies are installed, all components are available to finally build the WAR and run it on a servlet
container. The archetype is pre-configured to run using the dev-local Strolch runtime environment configuration. This
can be achieved by compiling using the following command:
mvn clean package -Prelease -Dstrolch.env=dev.local
Building the WAR uses the package maven goal, but to have the optimized WAR use the release profile. The environment
variable strolch.env=dev.local configures the WAR to have its runtime point to the absolute path where the sources are
located.
After the build is complete, the WAR will be located in the target/ directory. Copy it to Tomcat’s webapps/
directory and then start tomcat with the
following command:
cd tomcat10.1.9/bin
./catalina.sh run
Tomcat should then see the WAR and deploy it. If everything was setup correctly, then you should see the following in the logs after startup:
INFO  l.s.a.impl.ComponentContainerImpl:283 start - System: OS: Linux 5.16.15 Arch: amd64 on Java Azul Systems, Inc. 17 CPU Cores: 32
INFO  l.s.a.impl.ComponentContainerImpl:284 start - Memory: Memory available 16.8 GB / Used: 604.0 MB / Free: 540.6 MB
INFO  l.s.a.impl.ComponentContainerImpl:285 start - Using locale en with timezone Europe/Zurich
INFO  l.s.a.impl.ComponentContainerImpl:288 start - file.encoding: UTF-8 / sun.jnu.encoding UTF-8
INFO  l.s.a.impl.ComponentContainerImpl:307 start - <my-artifactId>:dev All 12 Strolch Components started. Took 120ms. Strolch is now ready to be used. Have fun =))
INFO  li.strolch.test.web.StartupListener:43 contextInitialized - Started <my app name> in 557ms
And now you can open a browser and login: http://localhost:8080/<my-artifactId>
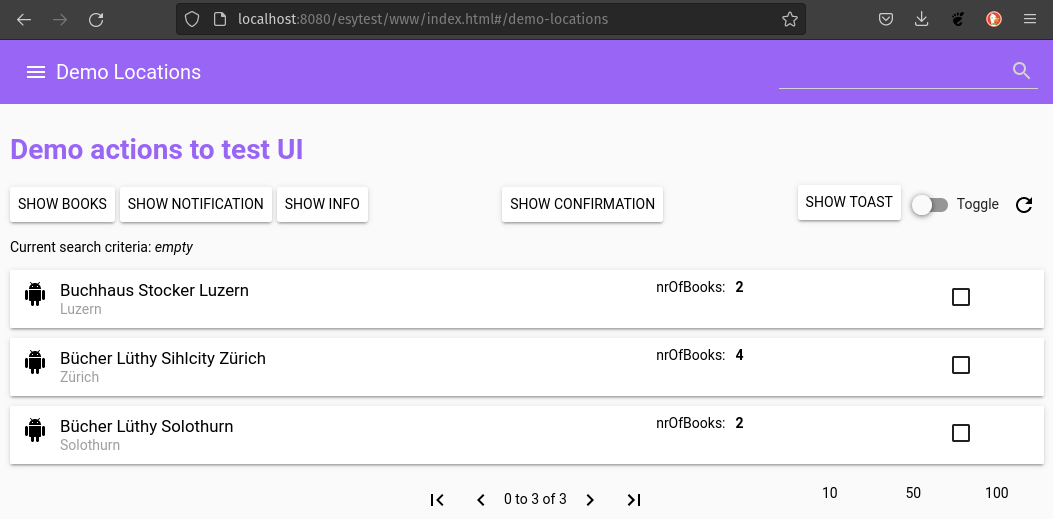
The default username and password are admin / admin. After logging in, you should be greeted with the following
screen:
Running the WAR on a remote system
The sources currently are configured for the dev.local environment. To use the WAR on a remote system, we need to
configure another environment, and have the path of the runtime updated in the StrolchBootstrap.xml file. Open the
file src/main/resources/StrolchBootstrap.xml and modify the root path in the test environment:
<env id="test" default="true">
    <root>/absolute/path/to/runtime</root>
    <environment>test</environment>
</env>
Now you need to copy the existing runtime directory to the remote machine at the above location.
Now we can build the project using the test environment:
mvn clean package -Prelease -Dstrolch.env=test
Now copy the WAR from the target/ directory to the webapps/ directory of your Tomcat 9.x installation. Now you can
start tomcat using:
catalina.sh run
In the console you’ll then see something like this:
INFO  l.s.a.impl.ComponentContainerImpl:283 start - System: OS: Linux 5.16.15 Arch: amd64 on Java Azul Systems, Inc. 17 CPU Cores: 32
INFO  l.s.a.impl.ComponentContainerImpl:284 start - Memory: Memory available 16.8 GB / Used: 604.0 MB / Free: 540.6 MB
INFO  l.s.a.impl.ComponentContainerImpl:285 start - Using locale en with timezone Europe/Zurich
INFO  l.s.a.impl.ComponentContainerImpl:288 start - file.encoding: UTF-8 / sun.jnu.encoding UTF-8
INFO  l.s.a.impl.ComponentContainerImpl:307 start - <my-artifactId>:test All 12 Strolch Components started. Took 43ms. Strolch is now ready to be used. Have fun =))
INFO  c.atexxi.esytest.web.StartupListener:43 contextInitialized - Started <my app name> in 244ms
And now you can open a browser and login: http://remove-server:8080/<my-artifactId>
The default username and password are admin / admin. After logging you, you should see the following view:
Happy coding =))